
Glass Blowing for Vacuum Devices
Filament Lamp B - Page 2 of 2
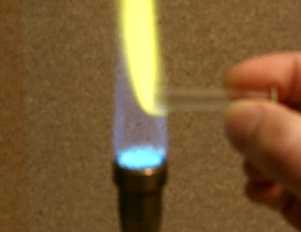 I then introduce the cut end of the flared tube to the flame slowly in a horizontal
position. I rotate the tube with just the last 10mm in the flame. When it reaches the
consistency of Plasticine, I remove it from the flame and squash it slightly between
two pieces of graphite. The end should not be completely closed.
I then introduce the cut end of the flared tube to the flame slowly in a horizontal
position. I rotate the tube with just the last 10mm in the flame. When it reaches the
consistency of Plasticine, I remove it from the flame and squash it slightly between
two pieces of graphite. The end should not be completely closed.
It is preferable to proceed immediately to the next step without allowing the end of the
tube to cool down. If it is allowed to cool, great caution must be exercised when
re-heating it to avoid cracking.
 This is how the end of the tube looks after squashing it. The purpose of this step
is to keep the lead-in wires centred while sealing them in.
This is how the end of the tube looks after squashing it. The purpose of this step
is to keep the lead-in wires centred while sealing them in.
I hold the tube horizontally with the squashed end horizontal. The free ends of the
Ni/Fe wire are inserted so that they protrude from the squashed end of the tube by about
10mm. I heat the end of the tube until the wires stick to the glass. When this happens,
I turn the gas up high and keep turning the tube over in the flame until the end is red
hot.
 I squash the end of the tube flat between two flat pieces of graphite and immediately
return it to the flame and heat it red hot again. I try to ensure that at least the last
2mm of tube fuses together completely. When this has happened, I shape up the sides of
the seal using the graphite so that it will fit down the 12mm diameter tube.
I squash the end of the tube flat between two flat pieces of graphite and immediately
return it to the flame and heat it red hot again. I try to ensure that at least the last
2mm of tube fuses together completely. When this has happened, I shape up the sides of
the seal using the graphite so that it will fit down the 12mm diameter tube.
The seal is annealed carefully and insulated with ceramic wool, allowing it to cool slowly
for at least ten minutes.
 This is the completed seal. The filament will be attached to the wires protruding from
the right hand side.
This is the completed seal. The filament will be attached to the wires protruding from
the right hand side.
I roll up the the wire protruding from the open end using a small pair of pliers. It must
be rolled up until it is 6mm down the tube.
 The wires have to be rolled up in the tube to prevent them fusing to the glass while this
tube is sealed to the bulb tube. Using two small pairs of pliers, I bend the ends of the
wires protruding from the seal into small hooks.
The wires have to be rolled up in the tube to prevent them fusing to the glass while this
tube is sealed to the bulb tube. Using two small pairs of pliers, I bend the ends of the
wires protruding from the seal into small hooks.
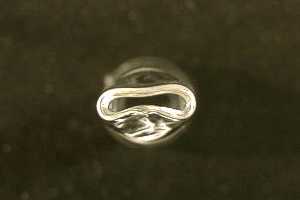
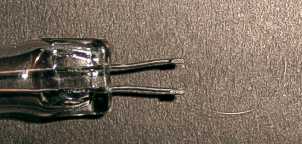 Using a small pair of pliers and a small sharp pair of wire cutters, I crimp a loop of
0.025mm diameter tungsten wire on to the ends of the seal wires. The tungsten wire loop
must not be so big that it will touch the inside of the bulb. The filament can just about
be seen in the photograph. Fingerprints can be cleaned from the glass using isopropyl
alcohol.
Using a small pair of pliers and a small sharp pair of wire cutters, I crimp a loop of
0.025mm diameter tungsten wire on to the ends of the seal wires. The tungsten wire loop
must not be so big that it will touch the inside of the bulb. The filament can just about
be seen in the photograph. Fingerprints can be cleaned from the glass using isopropyl
alcohol.
 Now the two main parts of the lamp have to be joined with a gas tight seal. The filament
is inserted into the bulb and the inner tube rotated until the filament is as well centered
within the bulb as possible. The filament must not touch the bulb.
Now the two main parts of the lamp have to be joined with a gas tight seal. The filament
is inserted into the bulb and the inner tube rotated until the filament is as well centered
within the bulb as possible. The filament must not touch the bulb.
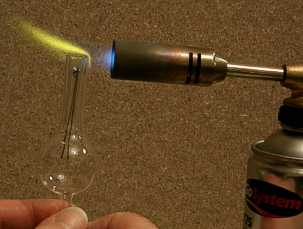
I hold the lamp pump tube downwards near the blow torch flame while rotating it for a couple
of minutes. It is essential to heat it very slowly to avoid cracking. I introduce the end
of the lamp to the flame and rotate the lamp until the inner tube no longer rattles inside
the outer tube. It is safest to continue to the next step immediately without allowing the
glass to cool.
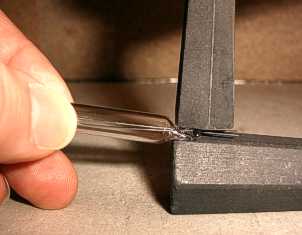
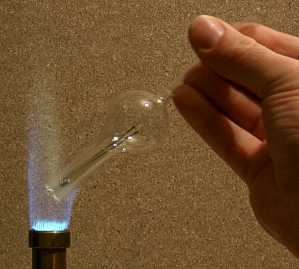 I then switch back to the bunsen type burner and hold the lamp at an angle as shown. The
inner tube should not fall out because the two parts will have begun to fuse. I keep
rotating it. When the end is soft, I press the two parts together with a flat piece
of graphite, repeating if necessary. Care has to be taken to avoid getting the tube so
hot that it deforms.
I then switch back to the bunsen type burner and hold the lamp at an angle as shown. The
inner tube should not fall out because the two parts will have begun to fuse. I keep
rotating it. When the end is soft, I press the two parts together with a flat piece
of graphite, repeating if necessary. Care has to be taken to avoid getting the tube so
hot that it deforms.
I then anneal the joint in the sooty flame and then wrap the whole lamp in ceramic wool,
allowing it to cool slowly.
When it has cooled, it is worth roughing it down on the pump to check for leaks before
extracting the connecting wires.
 The wires must now be unrolled from the tube using pliers. If they can not be reached,
a bent piece of 1mm diameter wire sometimes helps. The wires must be separated by cutting the
end of the loop.
The wires must now be unrolled from the tube using pliers. If they can not be reached,
a bent piece of 1mm diameter wire sometimes helps. The wires must be separated by cutting the
end of the loop.
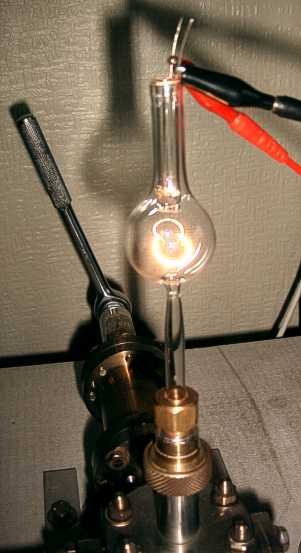
Once the lamp has been evacuated on the pump, it can be lit. This is a good idea because
any gas released when the filament is heated for the first time is pumped away. The 0.025mm
tungsten wire can be run at 200mA, which requires around 10V for this lamp.
I pumped this lamp down to about 3x10⁻⁵mBar, but it is probably not necessary to
achieve this high a vacuum. The lamp could be gas filled, which would extend the life.
I don't have the equipment to gas fill at present, but vacuum works well, especially
for low power lamps like this one.
Technical
Lighting Information explains the trade-offs between gas-filled and evacuated lamps.
There is also lots of other very interesting information.
I used the blow torch to seal off the pumping tube. The tube must first be heated gently
by holding the flame near it. A short section of it should then be heated as evenly as
possible until it starts to collapse. The tube will collapse much more suddenly than
usual because there is 1Bar of pressure acting on it. I try to get it to collapse evenly.
When the tube has fully collapsed and fused, I draw the lamp upwards until it detaches.
I put a piece of ceramic wool over the sealed tube which remains on the pump. This helps to
prevent it from cracking, which could cause damage to the pumping equipment. I then
immediately anneal the seal on the lamp in the sooty flame and then wrap the whole lamp
in ceramic wool to cool for 15 minutes. The soot and finger prints are cleaned off using a
tissue. Dampening the tissue with a little isopropyl alcohol or acetone helps.
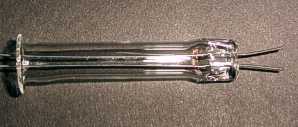
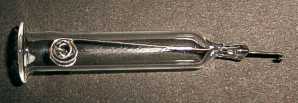
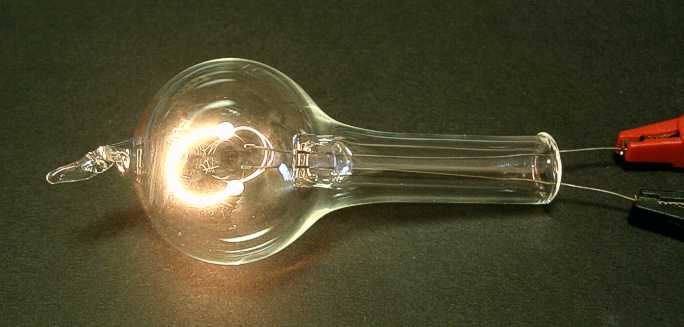
The completed lamp is shown below. The seal is a bit large and deformed. With practice
it should be possible to make neater pump seals.
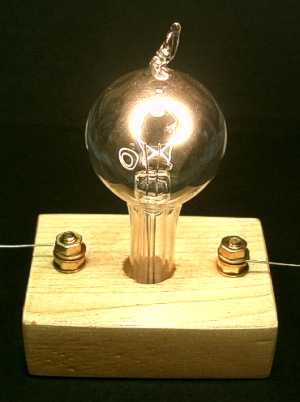 I decided to mount the lamp on a varnished block of wood. To ensure that the lead-in wires
do not short out, I sleeved one of them with a 3mm diameter glass tube. The lamp is fitted
into a hole in the block and secured in place with Araldite. The lead-in wires are
connected to the two M4 brass screws on the underside of the block. I covered the underside
with dark green baize cloth.
I decided to mount the lamp on a varnished block of wood. To ensure that the lead-in wires
do not short out, I sleeved one of them with a 3mm diameter glass tube. The lamp is fitted
into a hole in the block and secured in place with Araldite. The lead-in wires are
connected to the two M4 brass screws on the underside of the block. I covered the underside
with dark green baize cloth.