
Holography
A conventional photograph records only a two dimensional image. A camera
collapses the optical field into an image on the film. When
light is scattered by an object, information about the object is encoded
in the phase and amplitude. A hologram records the optical field. When it
is played back, it reproduces the original optical field as if the object
was present.
Recording a hologram requires an object beam and a reference beam. The object
beam illuminates the object. The object scatters the reference beam, encoding
upon it information about its shape, position and reflectivity. This information
is encoded as variations in the intensity and phase. In effect, the object
modulates the object beam. Film is used to record the optical field. Photographic
film is insensitive to phase. This is the reason for the reference beam. The
reference beam illuminates the film directly and uniformly. This uniform field
interacts with the object field, converting the phase information into amplitude
variations which can be recorded on film. The interaction of the reference beam
with the object beam causes interference fringes which are recorded on the film.
The amplitude and period of these fringes contains the information about the object.
When the hologram is played back, the fringes in the film act like a complex
diffraction grating and regenerate the optical field of the original object.
Practicalities
There are two main types of hologram, transmission and reflection. The transmission
hologram is relatively easy to make, but requires monochromatic light for playback.
The reflection hologram is more difficult to make but can be viewed using a white
light source. The light source should be as close as possible to a point source though,
or the hologram will appear blurred.
The fringe spacing on a transmission hologram is typically less than 1um. Using 600nm
light and a 40 degree object to reference angle with the reference beam normal to the film,
d = 600x10-9 / sin 40 = 930nm between fringes. This amounts to 1000 lines
per millimeter. This is the first major headache of holography. If any part of the setup
moves by more than about 0.5 of a wavelength, or 0.0003mm, the fringes will be lost and
there will be no hologram. With a small laser in the milliwatt range, exposure times can
be many seconds, so this is a major difficulty. Another problem is that the fringe
spacing varies with wavelength. This is one of the reasons why a laser has to be
used. A laser can produce a single wavelength. Another reason for using a laser
is coherence length. This is the distance that the beam can travel and there still
be a correlation between the phase. Gas discharge lamps only have a coherence length
of a millimeter or so. This would mean that only flat objects could be used. Not much
of a hologram. Even using a laser, care has to be exercised as coherence length is
often only 300mm or so. Also the laser must be thoroughly warmed up first or frequency
drift may occur.
In a reflection hologram, matters are even worse because the fringes are layered
through the film and only spaced by about half a wavelength. This makes stability
requirements even more critical. It also introduces the problem of film emulsion
shrinkage. This occurs during development and other processing because silver halide
is removed. Shrinkage moves the fringes closer together making the hologram shift
towards blue. Reflection holograms made using a red laser often play back green.
Due to the very high resolution required, special film and processing chemicals
are required. Both Agfa and Ilford have stopped making high resolution film for holography.
I still have a supply of Agfa 8E75HDNAH film which I keep in the refrigerator. I use Kodak
D19 which is designed for high resolution black and white photography. I have found to be
quite effective for both transmission and reflection holograms and relatively easy to use.
Most specialized holography developers have ridiculously short shelf lives. D19 keeps for
about a day in powder form once exposed to air. I have been keeping it in a vacuum desiccator.
The laser beam has to be steared and diverged to produce the object and image beams.
Because of the monochromatic and coherent nature of the laser beam, slight imperfections
in the optics can produce serious interference patterns. Ordinary mirrors can not be used
for holography because internal reflections would occur in the glass causing multiple
exit beams. Mirrors have to be of the front surface type where the metal coating is on
the front instead of the back. This makes them prone to damage and contamination. Lenses
are usually not very good because of imperfections. Spherical mirrors can be used or a
lense in conjunction with a spacial filter.
Home Made Spacial Filter
A spacial filter can be used to 'clean up' the laser beam. A spacial filter works in the
spacial frequency domain which is located in the back focal plane of a converging lens.
For the laser beam, only the zero spacial frequency component is required. This can be
selected by positioning a pin hole at the back focal plane.
 I managed to make a pin hole 60um in diameter using a pin. I used a stack of aluminium
foil, stuck the pin in and then chose the last punctured sheet in the stack. The size
can be measured using the laser to produce a diffraction pattern of the hole. The diameter
of the smallest ring should be measured because this corresponds to the fundamental spacial
frequency of the hole. Tan(angle/2)=ring_radius/distance_to_screen.
Hole_diameter=wavelength/Sin(angle).
I managed to make a pin hole 60um in diameter using a pin. I used a stack of aluminium
foil, stuck the pin in and then chose the last punctured sheet in the stack. The size
can be measured using the laser to produce a diffraction pattern of the hole. The diameter
of the smallest ring should be measured because this corresponds to the fundamental spacial
frequency of the hole. Tan(angle/2)=ring_radius/distance_to_screen.
Hole_diameter=wavelength/Sin(angle).
Aligning the filter is difficult. To assist with this I mounted the lens on a magnet
and mounted the foil on a steel plate. The distance between the lens and the foil can
be adjusted using the four nuts.
I was amazed at how much this rather crude device improved the purity of the diverged
beam.
Results
 This is one of the more elaborate transmission setups which I tried. Everything is
supported by inner tubes to reduce vibration. There are two layers of wood
with concrete blocks between to add mass. I used the cellar because the vibration
is least there. Working in the cellar is not very pleasant because it is not possible
to stand up.
This is one of the more elaborate transmission setups which I tried. Everything is
supported by inner tubes to reduce vibration. There are two layers of wood
with concrete blocks between to add mass. I used the cellar because the vibration
is least there. Working in the cellar is not very pleasant because it is not possible
to stand up.
The laser is the cream coloured box at the back. The film holder and object are in
the middle of the table.
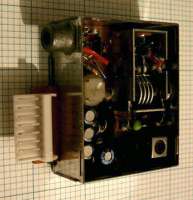
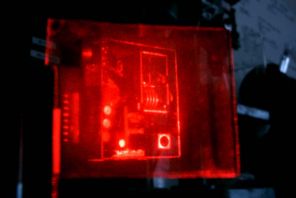
Above left is the modulator from a domestic video recorder. Above right is a
transmission hologram of it. It was played back using the helium-neon laser
and spacial filter.
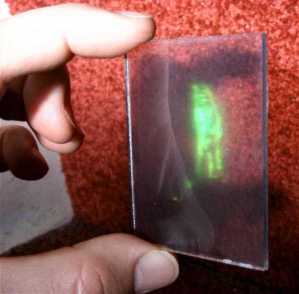 This is an unbacked reflection hologram of a 'Dungeons and Dragons'
figure. It was bleached and is therefore quite bright.
This is an unbacked reflection hologram of a 'Dungeons and Dragons'
figure. It was bleached and is therefore quite bright.
It plays back green because the film shrank during processing. This moves
the fringes closer together and so shortens the wavelength.
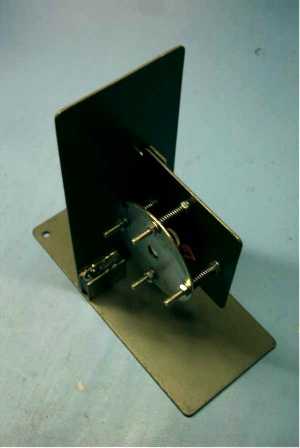
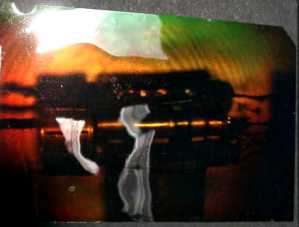 This is a reflection hologram of the delta style electron gun from
an old colour television. It is one of my first reflection holograms.
It was not bleached and is therefore not very bright. I painted the
back black to improve the contrast.
This is a reflection hologram of the delta style electron gun from
an old colour television. It is one of my first reflection holograms.
It was not bleached and is therefore not very bright. I painted the
back black to improve the contrast.